Thursday, April 7, 2016

Guilt Free Jazzed Margherita Pizza

Pizza for me is like the ultimate comfort food AND probably one of the unhealthiest things I eat.  I mean, hey, I'm from Chicago (Evanston) so don't I get a pass?  I grew up eating literally the best pizza in the entire world--sorry CA & NY but ya'll know the Chi has the best pizza on the planet ;-).  Deep dish pepperoni from Lou Malnatis, Unos, Giordano's...take your pick!  My mouth and tummy is excited just thinking about it, but I digress.  I won't lie to you and say that any pizza (besides my homemade version of this favorite) will give you the satisfaction of sitting in a Chicago pizzeria and enjoying that amazingly awesome buttery crust and gooey cheese. However, if you are like me and could stand to lose a few (or a lot) of pounds, I can give you an option that will be virtually guilt free.

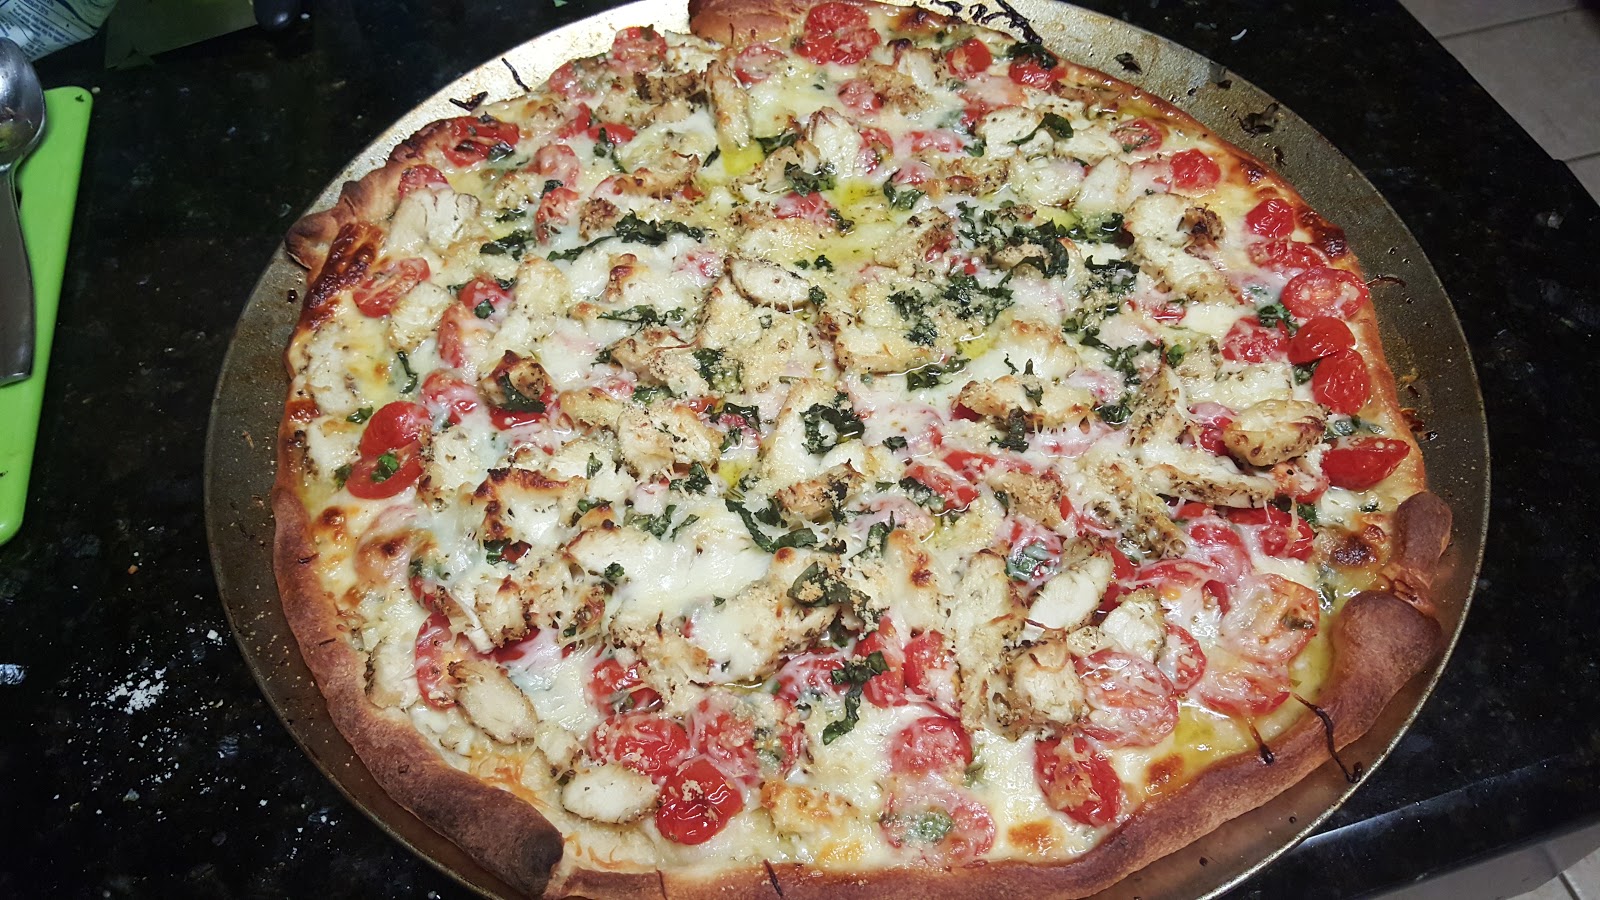
This jazzed (I call it Jazzed because that's what I call any recipe that I Jazzmyne-ify) recipe was born out of a pasta  that I have made for years plus my Chicago roots and my thought that the "sauce" would make an awesome version of a Margherita style pizza (margherita pizza basically means a thin crust pizza with fresh mozzarella, tomatoes, garlic and basil).  The result ended up being a lower-calorie yummy pizza that is sure to cure you craving for its high cal step brother.  It was also a great way to showcase veggies and get my kids to eat them.  I hide vegetables in food just like every other mom, but my new philosophy is to showcase them in really awesome recipes so that my kids learn to LOVE fruits and vegetables. If they never know what they are eating when the food taste good, they will grow up not wanting to eat them. This awakening came the other day in the grocery store when I got into a full blown argument with the 4 year who is convinced that mushrooms and spinach are yucky.  Never mind the fact that she eats this combo in pasta all the time and thinks its AMAZING.  I decided I have to a better job of not only making sure they eat healthy, but also making sure they know that eating healthy doesn't have to taste bad.  Otherwise, they'll end up like me and the hubby, deprogramming themselves as adults trying to make healthy choices without feeling deprived.  All said and done, this pizza is less than 350 calories with only 16 g of fat, 25 g carbs and 24 g protein per slice.  Comparatively, it reduces the calorie count and fat grams of a Classic Margherita pizza by 51% and that version doesn't even have chicken!  Add to that that you get a good boost of Vitamin C. Try it out, I promise, you won't feel deprived!


Prep It
This is one of those recipes where prep is key so here goes...
  • In the morning macerate the tomatoes in a large bowl by combining:
    • 2 pints halved cherry tomatoes
    • 1/4 cup of olive oil
    • 2 tbls minced garlic
    • 8 julienned basil leaves
    • 2 tsp kosher salt
    • 1/2 tsp red pepper flakes

     Cover with plastic wrap and let stand at room temperature for at MINIMUM of 4 hours.

  • Pre-bake your pizza crust for 5-7 minutes at 425 degrees, crust should be stiff but not browned.
  • Chicken can be baked in advance (recipe below)
What Goes In It
  • 8 boneless, skinless, chicken tenderloins
  • Non-stick cooking spray
  • 2 tbls Italian seasoning
  • 1 tbls Garlic pepper
  • 1 pkg Pillsbury thin pizza crust dough
  • 1 cup shredded mozzarella cheese
  • 8 pieces sliced mozzarella cheese
  • 1/8 cup grated Parmesan cheese 
  • 1/8 cup julienned basil leaves

How To Make It
  1. Place the chicken tenderloins on a broiler pan that has been lightly coated with cooking spray.
  2. Spray the chicken with a light cooking spray and then sprinkle the each side with the Italian seasoning and garlic pepper.  Bake chicken in a 400 degree oven for 15 minutes or until edges are golden.
  3. Remove chicken from oven and let cool.
  4. Meanwhile, start building your pizza.  On the pre-baked crust, first lay down the sliced mozzarella in a pinwheel pattern being sure not to overlap the cheese. You can add extra slices if you need to but 7-8 slices should be plenty.  Remember, as the cheese melts it will spread so its ok if there is a bit of space in between each of the slices.  This a key step to shield your crust from getting soggy during the cooking process.
  5. Using a slotted spoon, spoon the macerated tomatoes over the cheese. Be careful not to catch too much of the un-absorbed olive oil, otherwise your pizza will get too soggy.  You can use a pastry brush to evenly distribute the olive oil over the crust.
  6. Thinly slice the cooled chicken then evenly distribute on the top of the pizza.
  7. Sprinkle shredded mozzarella and Parmesan cheese over the top of the chicken and tomatoes.  This is a great time to get the kiddos involved.  I was assisted by my sous chef Jade.

  8. Top with basil leaves and bake at 450 degrees for 12-14 minutes or until edge of crust is golden brown and cheese is melted..
  9. Remove pizza from oven and let cool for 5 minutes.  Slice, serve and enjoy!

Extra Tips/Shopping List
What You'll Need
  • Basil
  • Cherry tomatoes
  • Sliced mozzarella
  • Pizza crust
What You Should Have on Hand
  • Chicken
  • Italian seasoning
  • Red pepper flake
  • Garlic pepper
  • Shredded mozzarella
  • Garlic
  • Olive oil
  • Kosher salt
Tips
  • The pizza can be made without the chicken to further cut fat and calories or would taste great with shrimp
  • The cooking method used for the chicken is one you should memorize, its how make chicken for wraps, pastas, sandwiches or even to top salad
  • Cooking the chicken on the broiler pan is key to get a crispy outer layer on the chicken without drying it out
  • If you don't have a broiler pan, the same cooking method can be achieved by placing a wire rack on top of a baking sheet that has  1/2 inch wall to prevent the drippings from escaping the pan
  • Fresh mozzarella can be used in place of the shredded cheese
  • Believe it or not but the thin pizza crust is the lowest calorie option versus the whole wheat crust
  • This recipe can be made gluten free by using a gluten free crust or bread
  • Tomatoes can be macerated the day before and then refrigerated overnight, but they need to sit at room temperature for at least 4 hours for the breakdown on the tomatoes to occur
  • Reserve olive oil (after all tomatoes are on the pizza) can be used as a light salad dressing
  • This is an awesome recipe to get the kids involved.  I find that when trying something new, they are more likely to eat it if they helped make it!

Wednesday, March 30, 2016

The Secret's in the Sauce: Green Cream Fish Tacos

One of our favorite family vacation spots is San Antonio and since we are so close, we have been three times.  The kids love Sea World and Dedrick and I love the food so its a great option for the whole crew.  Every time we go, Dedrick insists that we visit The Cove (if you haven't been there and are you are in San Antonio, you should try it, the food is amazing!) He loves their fish tacos, and he swore are the best he's ever had...until he had mine  After our first visit, he went on a mission to find equivalent tacos in the DFW metroplex, and I'm sad to say that his exhaustive search was unfruitful.  So I did what any self respecting gourmet home cook would do, I created a recipe that would his quench his craving!  I didn't eat the tacos on our trip so Dedrick had to serve as my senses and taster (he was real disappointed about that ;-) ).  After 2 tries, according to him I nailed it.  While this recipe is not identical to theirs, it's definitely an equivalent substitute according tp my hubby, a self-proclaimed fish taco connoisseur.  Give it a try, I'm sure your family will love it.  Also, for this week's tips, I provide ways to cut down the fat and make this almost completely clean and guilt free!

Prep It

  • Make sure you have fresh tilapia on hand, not the individually frozen ones (trust me this makes a difference in this recipe)
  • Wash and chop the cilantro the night before, store with paper towels beneath and on top so that it doesn't get soggie
  • Make the marinade (recipe below) and let the fish sit in it, refrigerated, for at least 4-6 hours or overnight works too
  • Roast and peel the peppers

What Goes In It

  • Fish
    • 3 tbls garlic
    • 1 c. cilantro, chopped
    • 1 tsp. chili powder
    • 1 tsp cayenne
    • 1 1/2 tsp kosher salt
    • 1 tsp black pepper
    • 1/4 c. Tequila
    • 2 lbs Tilapia
    • 20 small tortillas (corn or flour)
  • Cilantro Cabbage
    • 1 bag of coleslaw mix
    • 1/4 c. chopped cilantro
    • 1/2 tsp salt
    • 1/2 tsp fresh ground black pepper
    • 1/4 c. apple cider vinegar
    • Juice of 1 lime
  • Green Cream
    • 1 poblano pepper, roasted, peeled and seeded
    • 1/4 c. chopped red onion
    • 3 tbls lime juice
    • 1/4 c. sour cream
    • 1 tbls heavy cream, optional
    • 1 tsp honey
    • Salt & freshly ground black pepper

How To Make It

  1. In a blender, make the marinade by adding all fish ingredients except fish and tortillas. 
  2. Place the fish into a large plastic bag and pour in the marinade.  Marinate the fish in the refrigerator for a minimum of 1 hour.
  3. While the fish is marinating, make the cilantro cabbage and green cream.
  4. For the cabbage:
    1. In a small non-reactive bowl, add all cabbage ingredients.
    2. Toss together ingredients, check for adequate seasoning and adjust as needed.
    3. Cover, and place in the refrigerator while finishing the rest of the recipe.
  5. For the green cream:
    1. Place all ingredients in the blender and blend on high until well mixed and smooth.  Check for seasoning and add more salt and pepper to taste.  
    2. Green cream can be kept refrigerated for up to 2 weeks.
  6. After marinating, remove fish from the bag and discard remaining marinade.  Grill fish on a griddle pan or using a cast iron skillet over medium high heat.  Cook fish 4-5 minutes per side or until golden on both sides.
  7. Remove fish from heat and place into a large bowl.  Using tongs or two forks, break the fish into large chunks.  Be careful not to shred your fish, you want large bite sized pieces.
  8. Heat tortillas according to package instructions.
  9. Assemble the tacos by placing 2 tbls of fish into the tortillas, top with cilantro cabbage and green cream. Garnish with cilantro leaves. Serve immediately and enjoy!
Extra Tips/Shopping List
What You'll Need

  • Cilantro
  • Tequila
  • Limes
  • Coleslaw mix
  • Poblano peppers
  • Tilapia
What You Should Have on Hand

  • Chopped garlic
  • Chili powder
  • Cayenne pepper
  • Kosher salt
  • Black pepper
  • Tortillas
  • Red onions
  • Sour cream
  • Heavy cream (can be omitted)
  • Honey
Tips

  • If you don't have tequila, you can substitute it for a lime vinaigrette (I typically use Newman's Own Lite Lime Vinaigrette) or use McCormick's Mojito Lime seasoning packet mixed with olive oil and 1/4 cup of fresh lime juice
  • Cut down calories by using a reduced fat sour cream or greek yogurt and swapping the tortillas for butter lettuce
  • This recipe also works well with shrimp or any other firm white fish.


Wednesday, March 23, 2016

Taco Tuesday Gone Healthy

One thing that you'll learn about me (if you continue to follow my blog ;-) ) is that I am obsessed with Mexican food, especially TexMex. In fact I secretly moved to TX to make sure I'd always have an endless supply, jk...not really, ha! What I have learned about one of my favorite genre's of food, however, is that it can be really unhealthy if you're not careful.  Sure I love queso, nachos and sour cream just as much as the next person, maybe even a little more than I should, but I also realize that if I continue to eat like this everyday, I am eating myself into an early grave.  So, I decided to start looking for ways to cut the calories, without losing all the flavor.  I've seen this done a bunch of different ways on various shows so I am not claiming to be unique, but I will say that I have added some homemade touches that you are sure to enjoy.

Prep It
  • Be sure to take out your meat the night before, defrosting on the counter, especially with poultry is not always safe
  • Pre-wash your lettuce when you bring it home, wrap in paper towels to provide somewhat of a water wicking effect that will prolong the life of your lettuce
  • Check you pantry for spices, for this recipe you will need ground cumin, garlic pepper, kosher salt, chili powder, paprika and onion powder
  • Prepare salsa roja--can be store in an airtight container in the refrigerator for up to 3 weeks


What Goes In It
  • 1 lb Lean Ground Turkey
  • 1 tbls garlic pepper
  • 1/2 tsp onion powder
  • 1/2 tbs cumin
  • 1/2 tbls chili powder
  • 1 tsp paprika
  • 1/2 tsp kosher salt (you can add more after you check for flavor)
  • 1 tsp dried  or fresh chopped cilantro
  • Splash of lime (literally squeeze one time)
  • 10 butter or living lettuce leaves
  • Reduced fat shredded mexican blend cheese
  • 2 medium roma tomatoes diced
  • Low-fat sour cream
  • Fresh Salsa Roja (recipe below)
How to Make It
  1. Cook the ground meat in a large non-stick skillet over medium high heat until cooked through.  Be sure to use a large spoon or masher to break up the meat as it cooks.  
  2. While the meat is cooking, chop the tomatoes and set aside.
  3. After all the meat is browned, add all spices except cilantro.  Cook for 5 minutes more.   Check flavor and add more salt if needed.
  4. Add cilantro and splash of lime, cook for 1 more minute then remove from heat and set aside.
  5. Assemble the tacos by putting the meat on the bottom, top with cheese, tomatoes, fresh salsa and 1 teaspoon of sour cream.
  6. Believe it or not, that's it!  Literally a super health twist on tacos in less than 30 minutes.  My kids adored this recipe.  The little one even asked for seconds, which she NEVER does.  She ate more than me!  I title this picture, the aftermath.


Extra Tips/Shopping List

What You'll Need
  • 1 head of Butter or Living lettuce
  • Dried or fresh cilantro
  • Roma tomatoes
  • Low fat sour cream
  • Reduced fat cheese
  • Small Limes

What You Should Have on Hand
  • Onion powder
  • Garlic pepper
  • Kosher salt
  • Chili powder)
  • Cumin
  • Paprika

Tips
My salsa roja recipe was literally born from a night where I had cooked Mexican and realized that I was out of salsa and absolutely refused to go to the grocery store.  The cool thing about these kind of recipes, is that it means that I only used ingredients I had available to me, which you should also.  If you find that you are going to the store to buy any of this stuff, you should consider reviewing my blog post on properly stocking your kitchen and pantry here.

Salsa Roja (translation: Red Salsa)

  • 2 cans diced roma tomatoes, no salt added
  • 1 1/2 tbls minced garlic
  • 1/2 tbls dried cilantro
  • 1/2 tbls cumin
  • 1/4 cup tomato sauce
  • 1/2 tbls kosher salt (you may need to add a touch more at the end)
  • 2 tsp garlic pepper
  • olive oil
  • 1 cup diced onions
  • 1 cup  diced bell pepper
  • 1 tsp chopped jalepeños, optional
  • Lime or lemon juice (again this is dependent on what you have on hand)


Cook garlic in a saute pan of medium heat until fragrant, about 2-3 mins.  Add all remaining ingredient except cilantro and lime juice and cook for additional for about 10 minutes until bubbly.  Pour everything into a food processor.  Pulse to break down the tomatoes slightly.  Add cilantro and lime juice.  Pulse to desired consistency.  I like mine fine but not totally liquid.  Taste.  Add more salt if needed.  Pulse once more if you add salt.  Store in air tight container in the refrigerator for up to 3 weeks.  I like to keep my old salsa jars, so that what I typically use to store it but Tupperware works too!

Thursday, February 18, 2016

Twofer: Making 2 meals in less than an hour is a snap!

All of us love a bargain, me just as much as the next person.  Well, let me tell you, a twofer can help you save money and time in the kitchen too.  I have learned through being a working mom who is determined to feed my family good, homemade food most nights of the week, that a key to success is learning how to make 2 meals at once.  As I embarked on this challenge years ago, I found that it's easy to make 2 at once without increasing your normal dinner prep time, it just takes a bit of planning.  This type of meal can be done using any type of protein and veggies you like, you just have to pick two dishes that share most of the ingredients and you are golden.  For my example, I made my oh so famous Tomatillo Chicken Enchiladas and Tex-Mex Chicken Salad.  Try these 2 out, and I'm sure you will be pleased to find that this isn't as hard as it seems.  Plus you save yourself a whole night of cooking without sacrificing your family's home cooked meal.  This is absolutely perfect for those weeks where you only have 1 night to spend in the kitchen and you don't want to spend all the rest of the week eating from a drive-thru.

Prep It

  • To make food prep for this go quickly, I like to use a Rotisserie chicken (you could also pre-bake chicken tenderloins as well).  Either way, de-bone, skin and cut your chicken into 1 inch pieces ahead of time
  • Chop all fruit and vegetables (celery, onions, grapes, cilantro) and store in seperate zip-lock bags overnight


What Goes In It: Don't freak out, this list is for BOTH recipes (Enchilada only ingredients are blue and chicken salad only ingredients are green--all others are common between both recipes)


  • Cooked boneless skinless chicken, cut into 1 inch chunks
  • 1 red onion
  • 2 tbls minced garlic
  • 2 tsp cumin
  • 2 tsp chili powder
  • Olive oil
  • Kosher salt
  • Cilantro
  • 2 containers of Store bought Tomatillo Salsa (I prefer the Market Pantry Target brand, should be about 32 oz of salsa)
  • 1/2 lime, juiced
  • 1/4  cup all-purpose flour
  • 2 cups chicken stock
  • 10 large flour tortillas
  • Shredded cheese (mexican blend or cheddar)
  • 1/4 cup sour cream
  • 1 tsp garlic powder
  • 1/2 tbls Chicken Grill or Montreal seasoning
  • 2 tsp Paprika
  • 1/2 tbls McCormick Smokehouse Maple seasoning
  • 2 tsp Creole seasoning
  • 1 cup seedless purple grape halves
  • 1/2 cup celery
  • 1/4 cup mayonnaise
  • 1 tbls red wine vinegar
  • 1/2 tbls worteschire sauce
  • 1 tbls orange juice


How to Make It

Start with the Enchiladas
  1. Heat 2 tablespoons of olive oil in a large saucepan over medium heat. Add half the onion and cook until soft and caramelized, about 5 to 7 minutes.
  2. Add the garlic, 1 teaspoon of cumin, 1 teaspoon of chili powder, ½ tablespoon of salt and 2-3 tsp cracked black pepper then cook for another minute. 
  3. Add the flour and whisk to cook the flour without burning. 
  4. Add the chicken stock followed by ½ the tomatillo salsa and sour cream. Continue stirring over a low simmer until the flour cooks and the liquid thickens.
      
  5. Add 2/3 of the chicken, stirring until all chicken is coated in the sauce.  Squeeze lime juice into chicken mixture.
  6. Check seasoning and season to taste with more salt and pepper if needed and add ¼ cup finely chopped cilantro.  Remove from heat and let cool for about 10 mins.

Meanwhile begin prepping for the chicken salad…
  1. Put the remaining onions, chopped celery and chicken into a non-reactive bowl (glass or plastic works best with a lid).
  2. Add remaining cumin and chili powder plus the garlic powder, paprika, grill seasoning, creole seasoning, and smokehouse seasoning to the bowl.  Add grapes and set aside.

Back to the Enchiladas…
  1. Lightly coat a 9x12 inch Pyrex dish with non-stick spray. 
  2. Pour about ¼ cup of the reserve salsa into bottom and spread around so that it lightly coats the bottom of the dish. 
  3. Heat the tortillas in the microwave wrapped in damp paper towels for 30 seconds to soften.   
  4. To begin assembly of the enchiladas, set up an assembly line of the tortillas, cheese and chicken mixture.
  5. Pour the remaining salsa into a shallow bowl.  Dip each tortilla into the salsa so that it is lightly coated on either side. 
  6. Put 1 tablespoon of cheese followed by 2 tablespoons of chicken mixture into the tortilla and top with another 2 tablespoons of shredded cheese.
  7. Starting at one end, roll the tortilla up like a cigar, being careful to tuck the ingredients in as you go. Tip, if you put the inside ingredients closer to one side of the tortilla, it makes it easier to wrap.
  8. Place wrapped tortilla into the baking dish seam side down.  Repeat this step for each tortilla until all of the chicken mixture is used. 
  9. Pour any reserve salsa over top of the enchilada, then top with ½ cup shredded cheese.  
  10. Bake uncovered for about 30 minutes until cheese is bubbly and tortillas begin to slightly crack around the edges.

While the Enchiladas are baking, finish the chicken salad... 
  1. Add mayonnaise, vinegar, and orange juice to the bowl.  
  2. Stir until all chicken is well coated.  Taste and adjust seasoning to taste. 
  3. Refrigerate for up to 5 days.

To serve the Enchiladas, top with fresh cilantro, diced tomatoes and/or sour cream.


To serve the chicken salad, put a healthy ice cream scoopful on a Hawaiian roll or croissant and serve with chips.


Voila!  Two dishes and only 1 night of cooking.  Now that’s what I call a TWOFER!  Enjoy!

Extra Tips/Shopping List

  • What You'll Need
  • Cilantro
  • Tortillas
  • Chicken Grill Seasoning or Montreal seasoning
  • McCormick Smokehouse Maple Seasoning
  • Grapes
  • Orange Juice

What You Should Have Stocked
  • Everything else!

Extra Tips
  • Using a food processor to chop the veggies will make everything go faster and assure a good fine chop--especially if you have picky kids who like to pick things out of their food!
  • Always use a non-reactive bowl when using vinegars--if use a metal bowl, it can alter the flavor of your dish
  • If you are worried about overcooking the tortillas in the microwave, you can heat them on a griddle pan or if you have a gas stove, over the open flame on low. Just put the tortillas directly over the fire and heat on each side for 20-30 seconds.
  • Wrap the tortillas in damp paper towels or in plastic wrap
  • This same meal method could be done with spaghetti and beef enchiladas, which would almost be better because you'd also have a ton of leftovers!


Until next time,

the Gourmet Mommie

Monday, February 1, 2016

East Meets West: A Southern Classic with a Touch of Asian Flare

One of the main things that I am known for with my family and friends is turning almost everything I cook into a creole dish.  My motto is Tony’s Seasoning is good for everything, right!  Well, if you ask my sister I need to pump the brakes on the Creole seasoning periodically due to the higher sodium content.  This mindset combined with my new found desire to create healthy meals that my kids will love has caused me to explore other spices to really expand my definition of creole fusion.  For last night’s meal, I decided to combine a classic Chinese dish with a Southern favorite.  Plus if you’re watching your salt intake, my Asian Inspired Country Style Ribs, which I served with a Green bean and mushroom stir fry and basic fried rice, is the perfect way to keep all the flavor but lose a lot of the salt!  I created these recipes on the fly using only things that I had on hand so I promise the grocery list for this meal should be fairly short (if you stocked your kitchen the way I recommended) AND you can easily swap my choices out with spices and veggies you have on hand.  The thought behind this recipe is more method and experimentation rather than sticking to a rigid ingredient list. In this case, my experiment paid off, the family loved this and kids cleaned their plates. Having fun in the kitchen by combining new flavors is always goal and hey when in doubt trust your nose.  If it smells good, it will taste good.  If it doesn’t, well you might want to rethink your choices :-). 

Prep It
  • This is one of those meals that benefits from day ahead prepping.  I made it on a Sunday so I did all my prep work in the morning right after church, but all of this can easily be done the night before or on your normal prep day in order to cut down on time during the week.
  • If frozen, take out the meat the night before and place it in sink over night to allow adequate time to thaw.
  • Make the marinade and place in an airtight container in the fridge or if your house is fairly cool (70°C or below) you can leave it on the counter for up to 8 hours
  • Wash and prep your green beans by snapping off the tough ends.  If you plan to store these in the fridge, wrap a paper towel around them and place in a zip lock bag.  This will keep the moisture off the beans and they will last longer
  • If serving with rice, cook it a day in advance and store in an airtight container in the fridge until ready to use

What Goes In It
  • 1 ½ lbs Country Style Boneless Ribs
  • 2 tbls Chinese Five Spice Powder
  • 2 tbls Pork Rub (I used McCormick Brand)
  • 1 tbls Kosher Salt
  • 2 tbls brown sugar
  • 4 tbls bourbon (I used Southern Comfort)
  • 4 tbls Lite Soy Sauce
  •  2 tsp minced garlic
  • 1 tbls BBQ sauce or Hoisin Sauce
  • 3 tbls honey

How to Make It
  1. In small bowl, combine the five spice powder, pork rub, brown sugar and kosher salt.  Rub the rubs with the spice mixture then place in to a large zip lock bag.
  2. Using the same bowl, mix together the bourbon, soy sauce, garlic, BBQ sauce, and honey. Rub the pork belly with the marinade mixture and marinate for a minimum of 2 hours on the counter or up to 24 hours in the refrigerator.
  3. Preheat the oven to 350°F.
  4. Hold up the pork for a few seconds to allow excess marinade to drip off, and then place each piece on the griddle pan, cooking for 3-4 minutes per side. (NOTE: DO NOT THROW OUT YOUR MARINADE).

  5.  Immediately remove the ribs from the griddle pan and place on a broiler pan that has been lightly brushed with sesame oil. Brush with the reserve marinade.
  6. Roast the ribs for about 25-30 minutes.
  7. The ribs are done when the center of the rib strip feels firm or the internal temperature reaches 145°F. (medium rare) and 160°F. (medium) on a meat thermometer inserted at the thickest part.
  8. Remove the ribs from oven and let it cool for 3- 5 minutes. Arrange the ribs on a plate, top with sliced green onions or toasted sesame seeds and serve.

Extra Tips/Shopping List
What You’ll Need
  •  Country Style Ribs
  •  Pork Rub
  • Chinese five spice powder

What You Should Have Stocked
  • Kosher Salt
  • Brown sugar
  • Bourbon or other alcohol such as Southern Comfort
  • Soy Sauce
  • Garlic
  • BBQ sauce or Hoisin Sauce
  • Honey

Extra Tips
  • Taste your marinade before pouring it over the meat and adjust your seasoning.  If a sauce tastes good raw, it will be even better cooked!
  • Placing a paper around or in the same bag with veggies keeps moisture away and prevent premature molding
  • Cutting the green onions on an angle makes your dish look more elegant and finished
  • Sesame oil has a low burning temperature so be sure to keep your grill pan heat at Medium
  • If you don’t have sesame oil on hand, vegetable oil or non-stick spray can be used
  • If you are looking for a substitute for Chinese Five Spice Powder, you can make your own.  This will make more than you need store any reserve in an airtight container. I like to save empty spice bottles for this purpose.
    •  ½ tsp ground cloves
    • 2 tsp cracked black pepper
    •  1 tbls ground cinnamon
    • 4 tsp ground all spice
    •  1 tbls of fennel or dill seeds
  • If you are not great and using the touch test for meat doneness (yes I made that word up), get a meat thermometer, it takes all the guess work out of trying to figure out if you are medium, medium rare or well done!
  • Have fun experimenting and trying new flavors!

Until Next Time Happy Cooking,
the Gourment Mommie

Thursday, January 14, 2016

Recipe For Success: Preparing Your Kitchen for Everyday Cooking

Ever have that moment where the day gets away from you and at 5 pm you realize, oh crap I haven't planned dinner and haven't taken anything out!  Add to that needing to have dinner on the table before 7 pm so that one of your kiddos or husband gets a descent meal before having to head off to this practice or that game?  All of us have had this experience or one similar to it; but the one thing that I have found to be the biggest obstacle in this situation is avoiding having to go the store at the 9th hour or eating 3 day old leftovers, sandwiches or some other undesirable meal.  So what then is the solution to this conundrum? Having a fully stocked kitchen...that means fridge, freezer, pantry and spice cabinet.  I have so many friends who are baffled by the fact that I cook almost everyday and that I can fix my "Gourmet Mommy" meals without going to the store to buy every single ingredient each time.  As I have mentioned before, I have come from a long line of amazing cooks or as I like to call them, home chefs, who have taught me how to make something out of nothing and knowing the bare essentials to always have on hand.  Like a girl scout, I am always prepared! This way I can give my family great food without constant visits to the grocery store or having to settle for eating out.  Here are the 5 ingredients you need to build a kitchen that is sure to be a recipe for success.

Ingredient 1: Prepare Your Pantry

  • Dried Pasta--all kinds.  I usually keep at least 4 on hand at all times.  My favorites are:
    • Macaroni
    • Spachetti or Linguine
    • Lasagna
    • Penne
You can buy whichever your favorites are and just buy in bulk.  Did you know that even after    opened dry pasta can last up to 1-2 years.  Trust me, you will use it up without any concern for it going bad first.
  • Rice
  • Corn bread mix or Corn meal
  • White Sugar
  • Brown Sugar
  • Confectioner's/Powdered sugar
  • Honey
  • Chocolate chips
  • Nuts--whatever is on sale, in my case it's usually pecans
  • All Purpose Flour
  • Baking Soda
  • Baking Powder
  • Corn Starch
  • Sweet potatoes
  • Red potatoes or Russet (whichever you prefer)
  • Tortillas
  • Red Beans (or whatever you favorites are)
  • Tomato products, including paste, sauce and diced
  • Assortment of stocks--chicken, veggie, and beef.  I have also been known to randomly buy seafood stock, just in case ;-)
  • Bread crumbs
  • Sauces/Condiments
    • Ketchup
    • Mustard
    • Mayo
    • Worcestershire Sauce
    • Soy Sauce
    • Teriyaki Sauce
    • Hot Sauce
  • Vinegars/Dressings
    • WhiteVinegar
    • Red Wine Vinegar
    • Apple Cider Vinegar
    • Balsamic Vinegar
    • Olive Oil Vinegarette (I like Newman's Own)
    • Italian Salad Dressing
    • Ranch mix
  • Oils/fats
    • Extra virgin olive oil
    • Sesame Oil
    • Vegetable Oil
    • Non-stick cooking spray
  • Supplies
    • Plastic storage bags
    • Aluminum foil
    • Parchment paper

Ingredient 2: Spice it Up

  • Kosher Salt
  • Black pepper grinder (and peppercorns)
  • Creole Seasoning (Tony's is the best)
  • Old Bay seasoning
  • Garlic powder
  • Onion powder
  • Chili powder
  • Cumin
  • Cinnamon
  • Nutmeg
  • Dried parsley, thyme, oregano, basil
  • Vanilla extract
  • Assortment of regional seasonings: Italian, Greek and Chinese five spice are my favorites
  • Paprika
  • Lemon pepper seasoning (and recently I have started buying garlic pepper too, soooo yummy)
  • Sage
  • Poultry seasoning
  • Bay leaves
  • Cayenne pepper
  • Red pepper flakes

Ingredient 3: Freezing it Keeps It

  • Meat, meat and more meat!  I store all different cuts of chicken, ground turkey, ground beef, some type of fish filet (catfish or tilapia) and already peeled shrimp in my freezer at all times.  The trick is to buy it when it goes on sale.  This way you will never be without.  Buy your favorites or most used protein, but always have plenty on hand
  • Butter--again buy it on sale and put it in the freezer
  • Assorted shredded cheeses
  • Smoked meat (i.e. smoked turkey necks or hamhocks)
  • Frozen vegetables
    • Broccoli, peas, corn etc (or whatever your favorite is)
    • Stir fry mix
    • Miripoix  (also known as the Trinity for Creole cooking--green bell pepper, onions and celery. I buy bags of this almost every time I grocery shop.  It is a great time saver and goes in almost everything I cook.  Having it already cut and ready to go is my secret weapon on most nights.

Ingredient 4: Refresh Your Fridge

  • Roma tomatoes
  • Lemons
  • Limes
  • Celery
  • Bell pepper
  • Red onion
  • Green onions
  • Minced or fresh garlic
  • Flat leaf/Italian parsley
  • Cilantro
  • Basil
  • Green leaf lettuce
  • Baby spinach
  • Butter--I know I have this in freezer section too but I do always have 1 in the fridge and 2 in the freezer
  • French vanilla cream
  • Milk
  • Good quality White and Red wine--DO NOT BUY COOKING WINE. My rule is, if you can't drink it, why cook with it.
  • Crescent rolls
  • Ready made Pie crust
  • Shredded, Mild mexican velveeta and cream cheeses
  • Bacon
  • Eggs
  • Smoked sausage (can also be stored in the freezer)

Ingredient 5: Get Equipped

Doesn't do you any good to have all that food if you have nothing to cook it in.  Below is a list of the pans and utensils that I absolutely can't live without.  If you are missing any of these, I encourage you to go to your local Tuesday Morning or TJ Maxx and invest!


Pots & Pan
  • Non-stick skillet, large and small


  • Cast iron skillet


  • Broiler pan


  • Sauté pan


  • Dutch oven


  • Large stock pot


  • Colander


  • Sifter


  • Muffin pan


  • Fluted bundt pan


  • Pyrex dishes—square and rectangular


  • Cookie sheet


  • Mixing bowls


Utensils & Tools

  • Wooden spoons


  • Rubber spatulas


  • Thin/flexible spatula


  • Good quality knife set (At least a Senkou, paring knife and serrated bread knife)


  • Microplane/grater


  • Tongs


  • Lemon juicer


  • Potato/vegetable peeler


  • Measuring cups/spoons


  • Liquid measuring cup


  • Hand-held can opener


  • Blender


  • Food processor


  • Baking rack/cooling racks


I know this list may seem overwhelming, but I assure you that it is all an investment. Having these items on hand at all times will significantly limit how much you have to make mid-week grocery visits or eat out.  I have friends who have adopted this stocking method and to this day thank me for helping them get out of the constant store visit cycle.  Plus, if you follow this blog regularly (shameless plug) you will find that you can cook most of the recipes  I will post without heading to the store every time you want to try something new!

If you have any questions about any of this or where to find it, feel free to post in the comments.  Happy Shopping!

Twitter Delicious Facebook Digg Stumbleupon Favorites More